Proclaiming the Good News Artfully
I can’t speak for everyone, but personally, I find that sharing the faith is not always easy. It can be uncomfortable knowing that a peer, neighbor, or friend may not respond warmly when I insert a “foreign” religious reference into an otherwise “normal” secular conversation. And that is just with friends! I can’t imagine what the missionaries and evangelists throughout the ages felt when they preached the Good News to those who responded with physical violence.
I can’t speak for everyone, but personally, I find that sharing the faith is not always easy. It can be uncomfortable knowing that a peer, neighbor, or friend may not respond warmly when I insert a “foreign” religious reference into an otherwise “normal” secular conversation. And that is just with friends! I can’t imagine what the missionaries and evangelists throughout the ages felt when they preached the Good News to those who responded with physical violence.
Our Holy Father has given us great words of encouragement to go out and spread the Word of God with joy, love, and charity. And he has even assured us that we don’t have to be experts to share that message.
Great news! We don’t have to be apologists to share the Gospel. There are many different ways we can evangelize. We can be a light to others by living our faith in all areas of our life, including in our own homes.
Evangelists throughout the ages have used physical items and tangible symbols outside of and in their homes to share Christianity with those who did not understand. Early Christians used the symbols of the fish or the alpha and omega. St. Patrick used the shamrock to represent the Trinity. The cross itself is a mere symbol of Christianity that has for centuries helped open dialogue and served as a reference for evangelists.
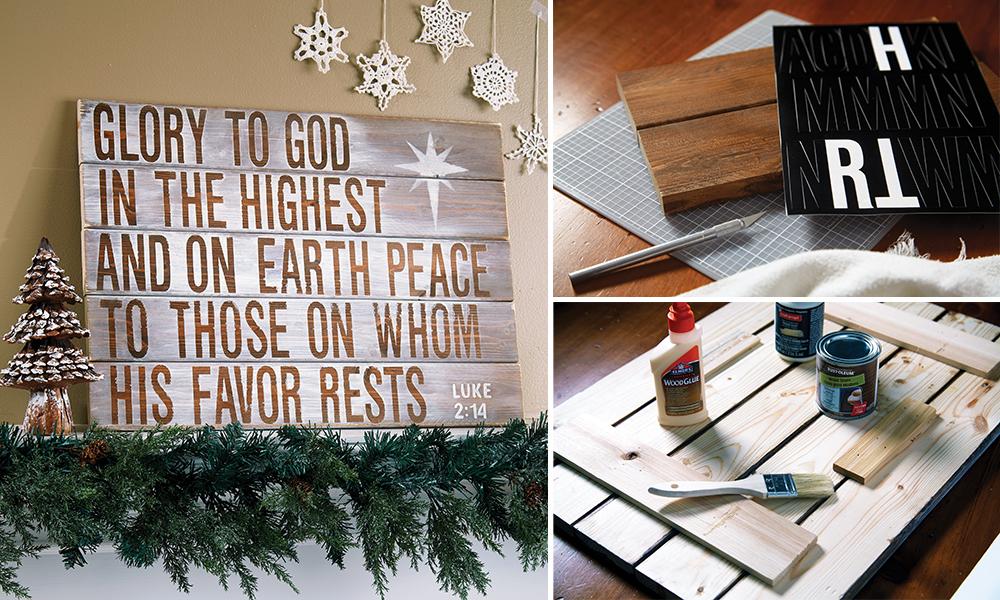
One way we proclaim the Good News in our home is through the art and decoration we display. The artwork you see here was made inexpensively with just a few supplies, a little bit of creativity, and a lot of joy for proclaiming the Good News!
DIY Christmas Sign
- Unfinished wood panel (smooth surface is best)
- Dark wood stain
- Vinyl letter stickers
- Star stencil (cut from cardstock)
- Off-white acrylic paint
- Paintbrush
- Cloth rag
Either purchase or build a wood panel (I used 1” x 4” scrap wood boards and cut them into 24”-long pieces. I assembled the panel by gluing two vertical boards to the back). Stain the panel and allow it to dry completely. Arrange the letter stickers on the panel (vinyl letters are best — they can be purchased in the mailbox hardware aisle at most large shopping centers). Use a plastic card to firmly rub the surface of the letters, so the paint doesn’t run underneath (it’s OK if a little bit does). Apply a thin coat of acrylic paint over the entire surface. Take a damp cloth rag and rub away any excess paint. Also wipe some of the paint away in the area where the star will go and near the edges to reveal some of the stain underneath. Allow the piece to dry and carefully peel away the stickers. Position the star stencil on the panel and use a cloth rag to blot acrylic paint within the stencil area. Lightly sand the edges of the piece to give it a more rustic look. If desired, add picture-frame hardware to the backside of the piece so it can be hung on a wall.